Wednesday, October 18, 2006

Strip paint

Removing paint. I will come back and comment on this later.

Panel Fabrication on a 1952 Aston Martin


This car is undergoing a complete re-paint. The existing finish, while shiny, was not of the greatest quality. It was completely removed using a combination of chemical stripper, plastic media-blasting and sanding. We discovered that the bodywork beneath the paint left a lot to be desired (this is my way of being kind). Actually, the patron saint of Bondo must have visited whatever shop had previously worked on this car. That’s all I have to say about that.

The body itself is a piece of artwork. Those Brits were masters at forming and welding aluminum. Unfortunately, the previous fifty-four years had dealt a few blows. The bonnet had taken a bit of a pounding and the repairs done over the years were not something we could apply a new finish to. Besides, the underside of the bonnet is completely exposed when open so the appearance inside has to be just as good as the outside.

We mounted the bonnet in a large dolly using the same attaching points as the car. This gave us a stable platform while providing one-man mobility.

Wednesday, June 14, 2006

The Biturbo has been painted


, color-sanded and polished and is now in the assembly stage. Many new parts are still available for these cars and the supply of good used parts is also fairly plentiful.

These cars have a considerable amount of bright-work; polished stainless steel trim which gets dented and scratched over-time. Generally, if the item is available, it is more cost efficient to buy the new one than to spend several hours repairing and polishing the original. In our case there were a couple pieces that we elected to repair because the damage was minor.

Working dents out of trim is essentially the same as metal work on a fender, just smaller. Low spots are carefully raised until the surface is level. Progress is checked by sanding using small sanding blocks, this reveals the low spots and the high spots. Naturally, the use of abrasives in this way leaves scratches which must be removed by using progressively finer grits. Stainless steel is pretty hard. Once the scratches are softened we can start buffing. This is the tedious part but worth every bit of time spent.

We will be installing the engine and the interior in the next few weeks. I was able to purchase a nearly complete used interior in good condition. Since this is not to be a show car we can save the expense of a new, hand stitched interior.

Scuff and Buff on a Cobra


This is the real thing. Even though it is not a sixties vintage car the eighties version is an actual Cobra, not a replica. This car is in good shape and just needs a little help with the paint finish.

We have washed the car, removed the trim that would otherwise get in the way and wet-sanded the entire body with 2000 grit. The goal is to remove just enough material to level any orange-peel. We took the opportunity to touch-up the small chips that any car collects if actually driven on the street. I for one would rather have to deal with chips than to own a museum piece.

Carefully compounding and polishing the sanded paint leaves a brilliant shine. This job took only about two days but the result was really striking.

Wednesday, April 12, 2006


Here is a job we recently did refinishing a complete set of wheels for a 1970 Lamborghini Muira. The original cast wheels are pretty rough on these cars; the appearance is that of a bad stucco job painted flat silver.

We started by dismounting the tires. Although it is certainly possible to refinish a wheel with the tire on, the amount of work needed in this case made tire removal necessary.

While the wheels could have been chemically stripped, we decided on media blasting. Glass bead had hardly any effect on the existing finish which had a kind of gravel guard consistency. I switched to garnet, a very aggressive material which will readily damage machined parts if improperly applied.

Even with the garnet the job took what seemed like a long time. An unexpected benefit was that the surface of the casting itself was considerably less rough when I was finished. The goal here was to re-paint not to metal-finish and polish to a shine. That would have taken several days per wheel. That said, I did want to smooth-out the rougher portions of the casting. I used my die grinder along with various sanding drums and rolls to carefully remove the high spots.

The other issue concerned voids and missing material. Some of the castings on the older exotics leave a lot to be desired. We have seen oil leaks in engine blocks caused by porous castings. I used ‘All-Metal’ to fill voids and chips. This is pretty tough filler that I think will stand up well to the abuse a wheel can see. Again, I was not trying for a perfect finish; I definitely left most of the original ‘character’ as it was.

After the filling stage, it’s pretty much standard refinishing work with a huge amount of inside corners. We love sanding them, don’t we? The backsides of the wheels were prepped for paint to the same degree as the fronts.

The two-stage polyurethane silver I applied has way more bling factor than the original finish and is far easier to clean.

Thursday, January 26, 2006

DeTomaso Pantera - complete restoration


DeTomaso Pantera, an exotic name for a potent combination of ground-pounding American muscle and Italian style. An ‘in your face’ kind of car straight out of the seventies.

This car had been in storage a long time. And time had not been kind. But the owner, having been informed of the extent of the work required, was committed to the project.

A couple words in support of seemingly unworthy projects: Here’s the thing, exotics, along with American muscle cars and European sports cars, were designed for people who are passionate about cars. Since there are very few cars worth restoring from a strictly dollar and cents point of view, it is passion for the form that accounts for all the work being done on cars that a mere bean counter would send to the scrap yard without a second thought.

And another thing, it is easy to say that a specific car is not worth restoring given how much one could spend on some other car in better condition. That may be true, but that other car is always somebody else’s. Somebody else’s choice of quality, of time and money invested; everything right down to the color. So if I’ve held onto the car my Dad owned, and thirty years later want to restore this rust bucket, some other car just won’t do. Price doesn’t even show up on the radar, it’s a non-issue


So this is a total teardown, rotisserie restoration. In fact, we determined that the 351-C was salvageable and that the ZF gearbox needed minimal work, the support structure of the unibody was sound and that it was mainly the exterior sheet metal that had taken most of the abuse, along of course with the interior.

Panteras, like most of the exotics of that age, were built with absolutely zero regard to long term corrosion protection. There are simply too many instances of dead air spaces with no allowance for drainage. Combine this with a tendency to neglect to paint or otherwise protect the inside surfaces and it almost seems like a conspiracy on the part of the Italians. You know what, they went fast and looked good and that’s all that mattered.

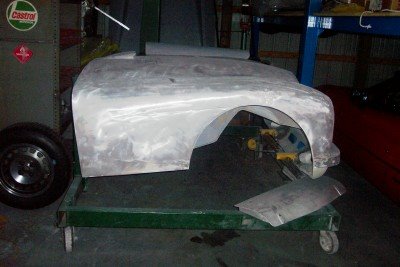
The crew at Exoticars-USA in Frenchtown, NJ got started completely disassembling the car down to its component parts. Phil Murphy handled the task of researching the availability of parts. He was able to order all the major panels including fenders, door skins, quarters and outer rockers.

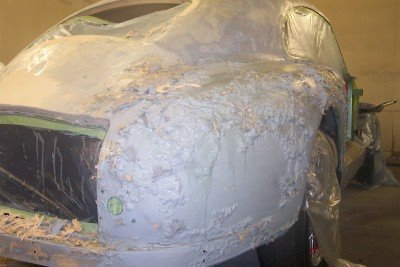
Having obtained exterior sheet metal, the task of putting it all together is in the hands of Randy Tartanian, the resident panel beater. Fabricating inner panels out of cold rolled sheet metal is sometimes difficult when there is little of the original piece to follow. “The goal is to duplicate the function of the original part” says Randy. So using a wide variety of tools including the bending brake, English wheel, shrinker/stretcher, plasma cutter and an array of hammers, the needed panels are formed and fitted into place. Welding is accomplished with the best method for the particular job. MIG, TIG, Spot and Oxy-acethelyne welding are used.

Currently the Pantera is in the process of having the sheet metal installed. The engine is partially rebuilt and the gearbox has been serviced and resealed. The choice of color is yet to be made.
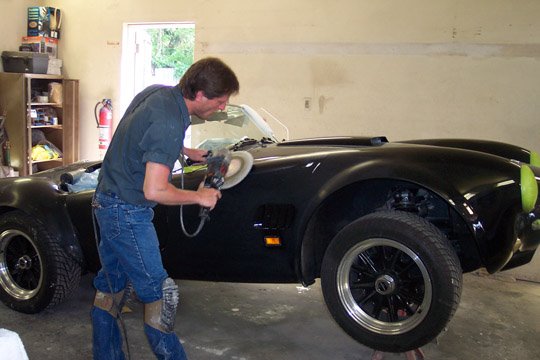